https://365datascience.com/scrape-data-locked-behind-login/ -

In our last tutorial, we looked into request headers and cookies and their role when you scrape data.
So, what’s the next problem you could encounter when scraping?
Yes, it’s login screens.
Sometimes, you might set your sights on scraping data you can access only after you log into an account. It could be your channel analytics, your user history, or any other type of information you need.
In this case, first check if the company provides an API for the purpose. If it does, that should always be your first choice. If it doesn’t, however, don’t despair. There is still hope. After all, the browser has access to the same tools when it comes to a request as we do.
How to Scrape Data That Requires a Login – Important Disclaimer
Information that requires a login to access is generally not public. This means that distributing it or using it for commercial purposes without permission may be a legal violation. So, always make sure to check the legality of your actions first.
With that out of the way, let’s walk through the steps to get past the login and scrape data.
Depending on the popularity and security measures of the website you are trying to access, signing in can be anywhere between ‘relatively easy’ and ‘very hard’.
In most cases, though, it exhibits the following flow.
First, when you press the ‘sign in’ button, you are redirected to a log-in page. This page contains a simple HTML form to prompt for ‘username’ (or ‘email’) and ‘password’.
When filled out, a POST request, containing the form data, is sent to some URL. The server then processes the data and checks its validity. In case the credentials are correct, most of the time a couple of redirects are chained to finally lead us to some account homepage of sorts.
There are a couple of hidden details here, though.
First, although the user is asked to fill out only the email and password, the form sends additional data to the server.
This data often includes some “authenticity token” which signals that this login attempt is legitimate and it may or may not be required for successful login.
The other detail is related to the cookies we mentioned last time.
If we successfully signed into our account, client-side cookies are set. Those should be included in each subsequent request we submit. That way, the server knows that we are still logged in and can send us the correct page containing sensitive info.
So, how can you do this in practice?
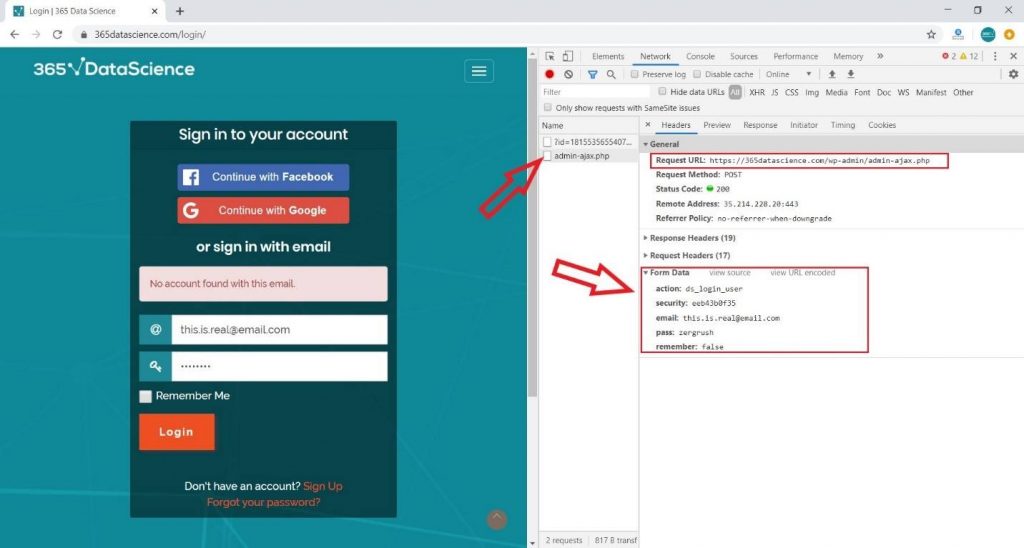
The first piece of the puzzle is to find out where the ‘post’ request is sent to and the format of the data. There are a couple of ways to do that. You can either infer that information from the HTML or intercept the requests our browser submits.
The majority of login forms are written using the HTML tag ‘form’:

The URL of the request can be found in an attribute called ‘action’, whereas the parameter fields are contained in the ‘input’ tags. This is important because the hidden parameters will also be placed in input tags and thus can be obtained.
Another important piece of information is the name of the input field.
As trivial as it may seem, we don’t have that knowledge a priori.
For example, think about the username. What should that parameter be called? Well, it might be simply ‘userName’, or it could be called ‘email’, maybe ‘user[email]’. There are many different options, so we should check the one employed by the developers through the ‘name’ attribute.
This information can also be obtained by intercepting the browser requests and inspecting them.
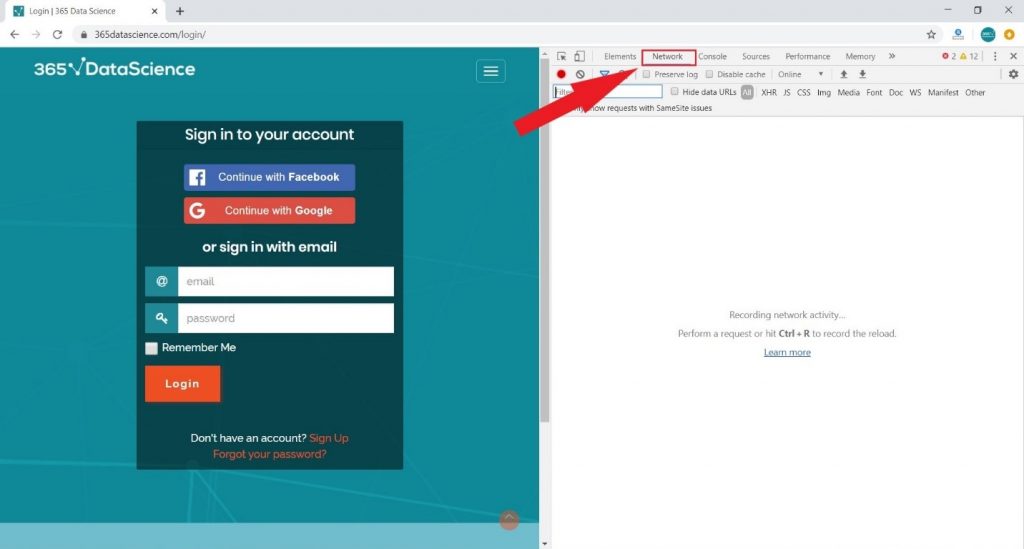
We do that with the help of the Developer tools. Specifically, in the Chrome developers’ tools, there is a ‘Network’ tab that records all requests and responses.

Thus, all we need to do is fill our details and log in while the Network tab is open. The original request should be there somewhere with all request and response headers visible, as well as the form data.

However, bear in mind that it could be buried in a list of many other requests, because of all the redirects and the subsequent fetching of all resources on the page.
Now that we’ve got the URL and form details, we can make the POST request.
The data can be sent as a regular dictionary. Don’t worry about the subsequent redirects – the requests library deals with that automatically, by default. Of course, this behavior can be changed.
But what if we want to then open another page while logged in?
Well, we need to set our cookies in advance first. That means we have to take advantage of requests’ sessions.
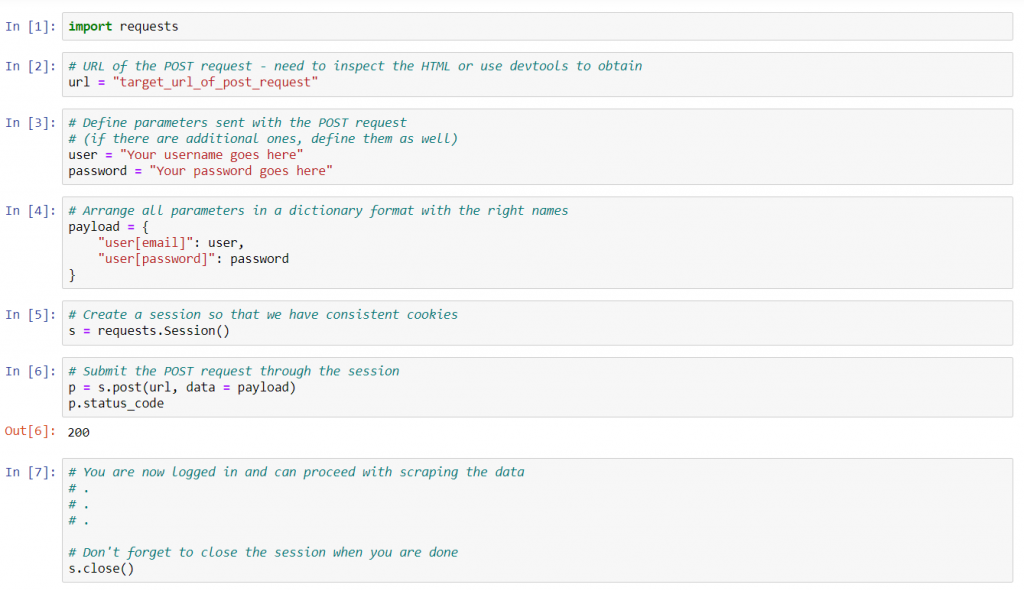
Summarizing all this, a sample code for a simple login may look like this:

Here we define all the form details, then we create the session and submit the POST request for authentication. Note that the request is made through the session variable, in this case, ‘s’.
Some websites employ more complex login mechanisms, but this should suffice for most.
Now you know how to tackle a login when scraping data.
I hope this tutorial will help you with your tasks and web scraping projects.
Eager to scrape data like a pro? Check out the 365 Web Scraping and API Fundamentals in Python Course!
The course is part of the 365 Data Science Program. You can explore the curriculum or sign up 12 hours of beginner to advanced video content for free by clicking on the button below.
#Python
#365datascience #DataScience #data #science #365datascience #BigData #tutorial #infographic #career #salary #education #howto #scientist #engineer #course #engineer #MachineLearning #machine #learning #certificate #udemy
No comments:
Post a Comment